Data Bucket Guide: File-Receiving Type
Before starting
One issue you’ll face when trying to use IoT for your business is figuring out how to save the data you collect from IoT devices into servers or the cloud. Usually this requires technical knowledge to set up, or time and cost to hire someone to do it for you.
The Data Bucket fixes these problems by making it simple for anyone to quickly set up their own system for collecting and storing data into the cloud.
For storage, the Data Bucket uses Google’s highly-secure Google Cloud Platform open_in_new , giving you access to the fastest Big Data processing available.
What is a Data Bucket?
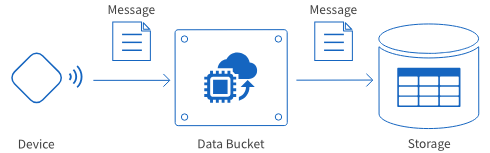
Data Buckets provide a system for collecting data from IoT devices and storing that data into the cloud.
BLOCKS creates this system automatically within your Google Cloud Platform (GCP) project, but creating a Data Bucket does not require specialized knowledge of GCP.
warning Because the Data Bucket creates its system within your GCP project, GCP service charges will apply separately from BLOCKS fees.
There are two types of Data Bucket based on the type of data transferred.
| Type | Explanation |
|---|---|
| Message-receiving |
|
| File-receiving |

|
How to create IoT Boards
This page explains how to create a file-receiving IoT Board.
For information regarding message-receiving IoT Boards, refer to Data Bucket Guide: Message-Receiving Type
Note for Self-Service Plan (Free Trial) users:
-
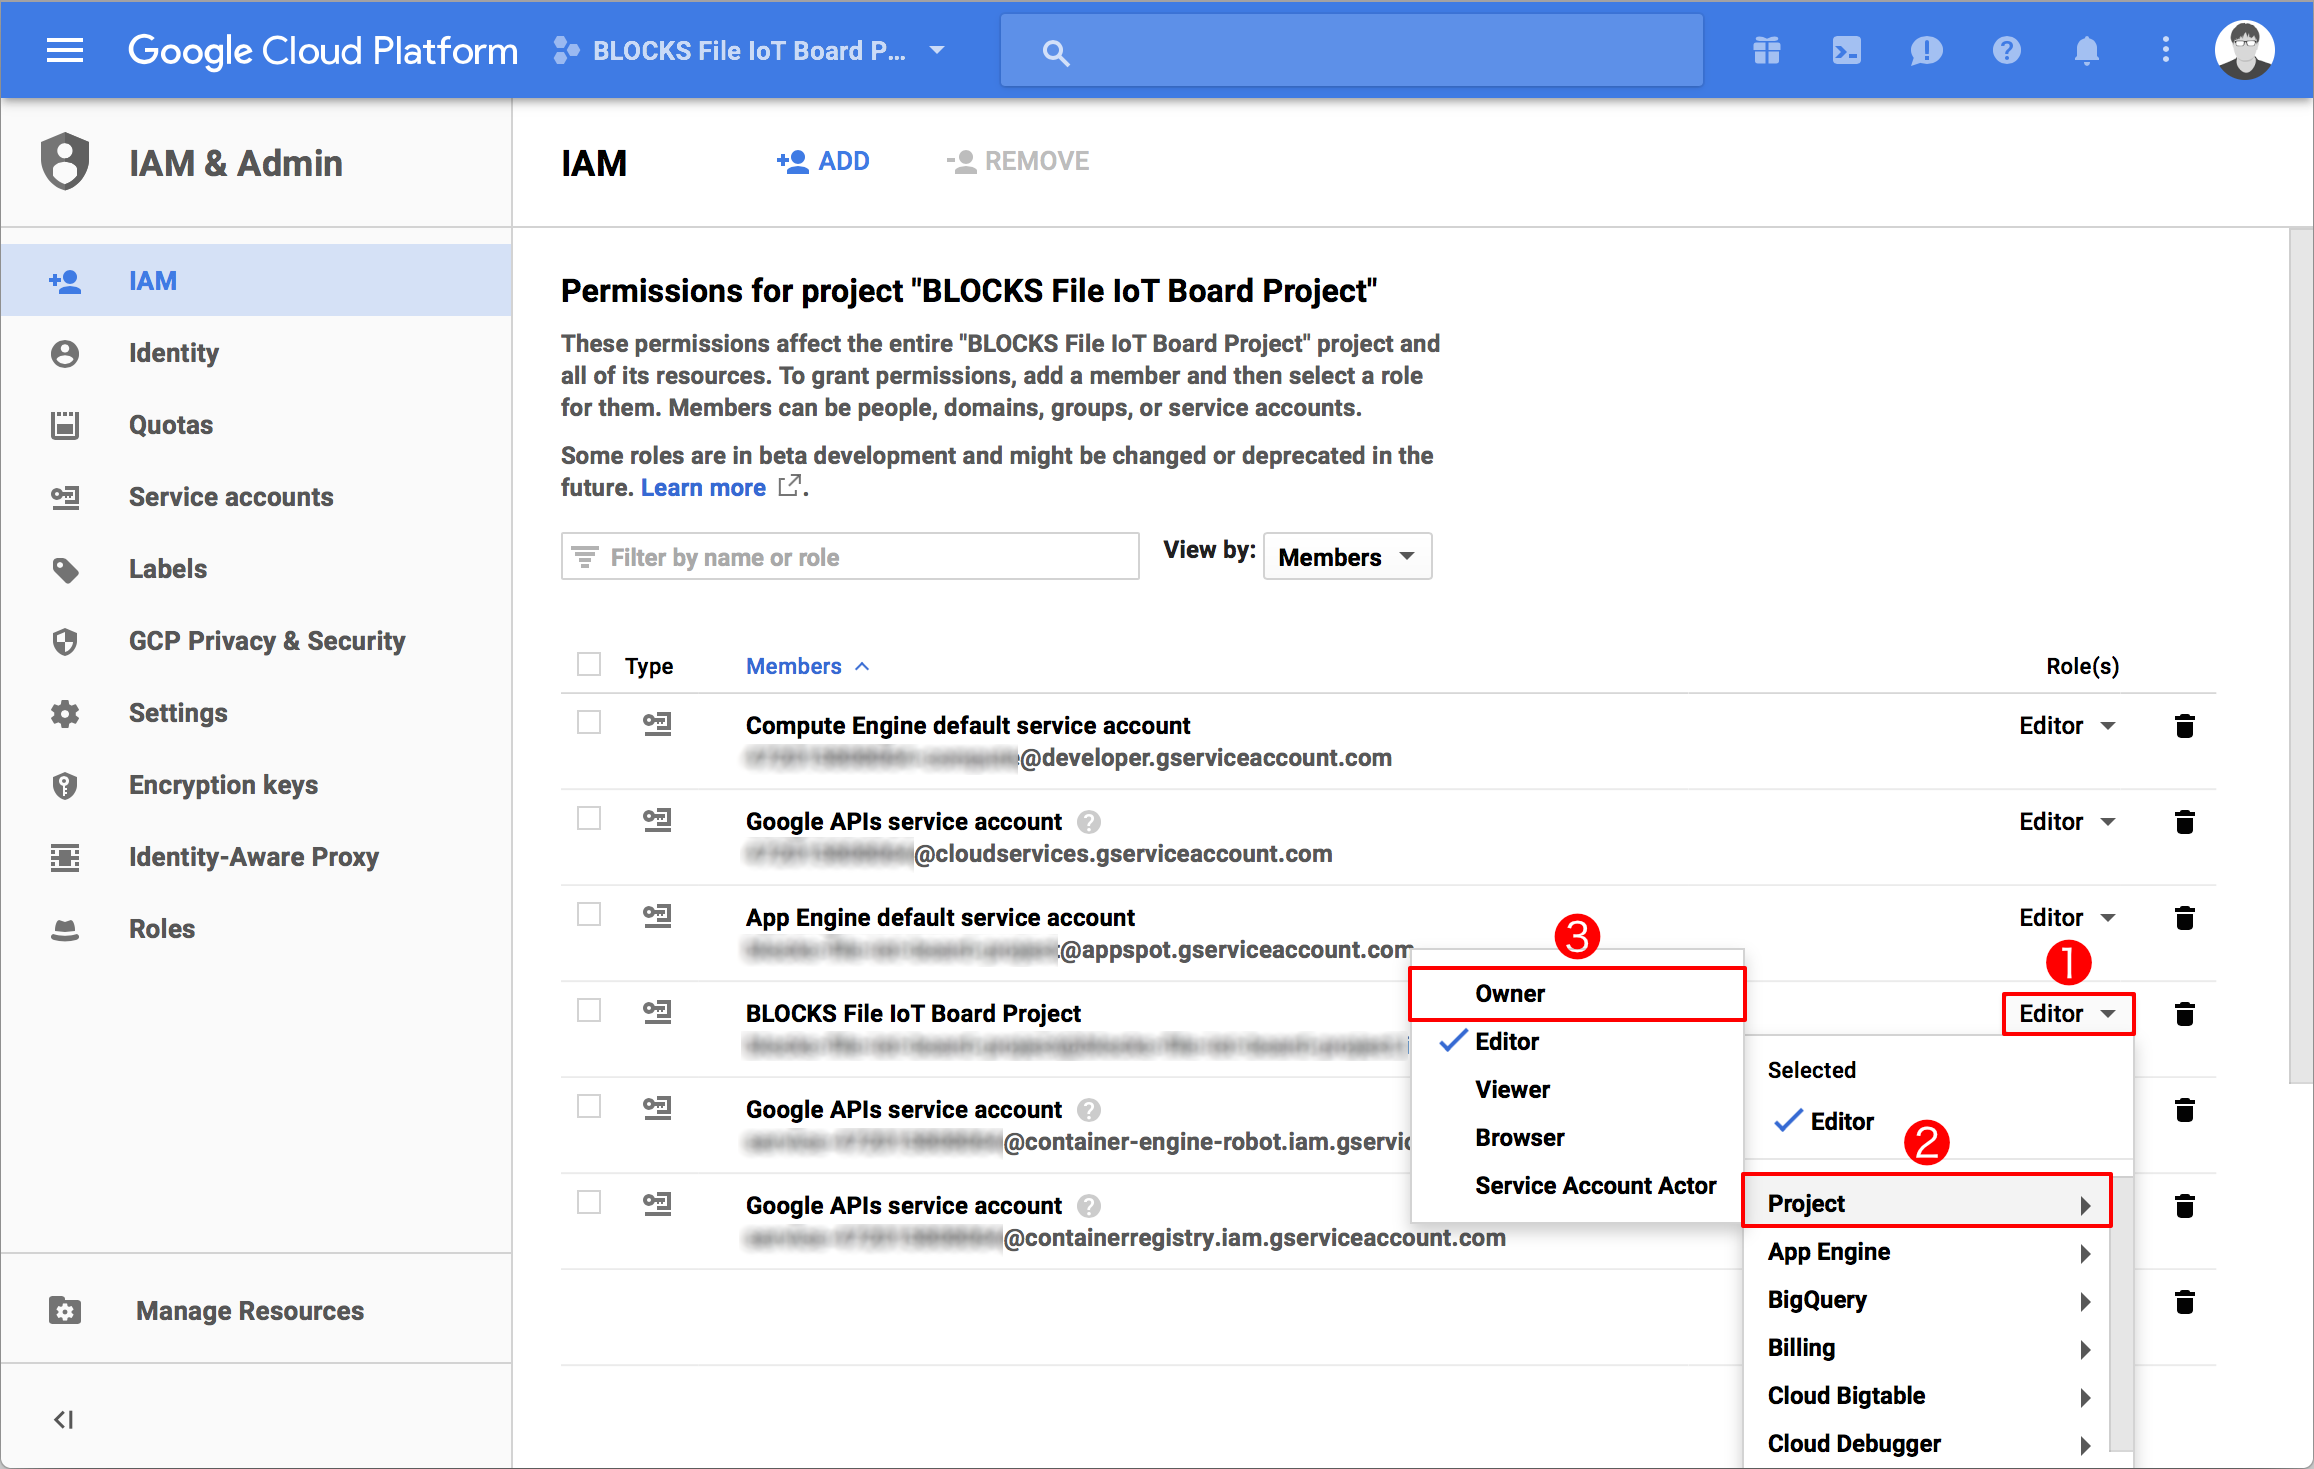
The GCP service account used with a Data Bucket must be given owner privileges.
If the GCP service account does not have owner privileges, access the IAM page in the GCP console open_in_new and change the relevant GCP service account’s role to Owner (Steps 1 → 2 → 3 in the image below).
General outline for creating Data Buckets
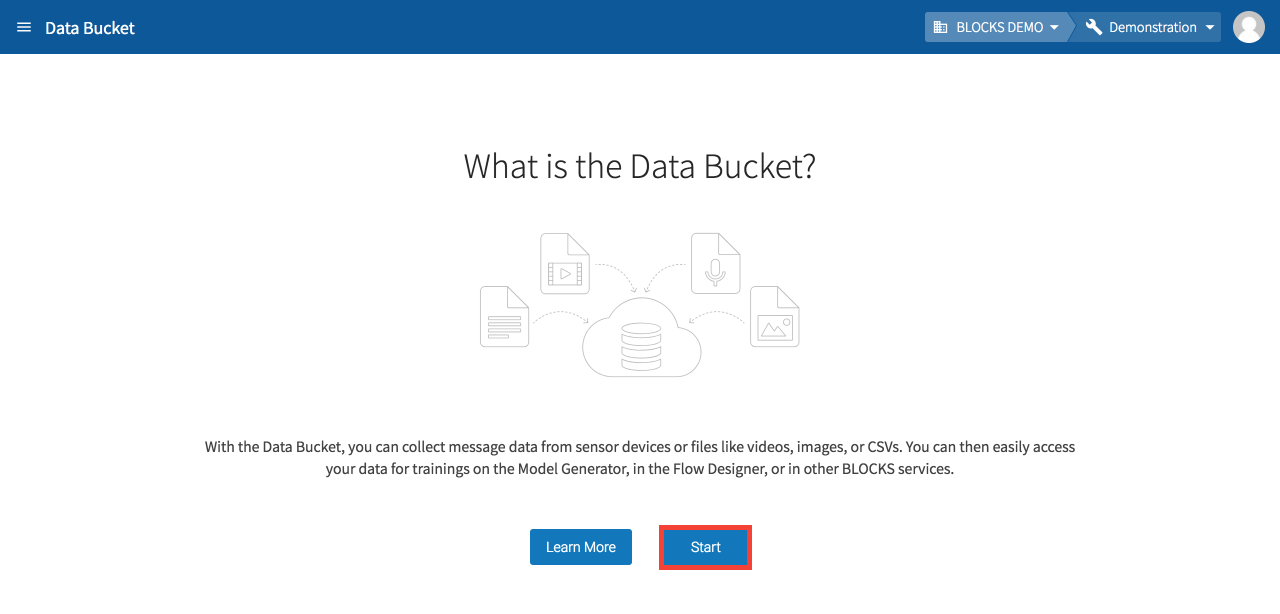
To create a new Data Bucket, either click the Start on the “What is the Data Bucket” screen, or Add from the Data Bucket list.
The general steps for creating a Data Bucket are as follows:
- Create a new Data Bucket
Select the type of Data Bucket and give it a name. - GCP service account settings (Self-Service Plan users only)
Designate the GCP service account to be used with the Data Bucket. - Entry point settings
Configure the destination for data sent from devices to the Data Bucket. - Storage settings
Configure how the Data Bucket will store the data it has received and processed. - Flow Designer connection settings
Designate a Flow from a Flow Designer that will execute when the Data Bucket stores the data. - Confirm settings
Review your settings and create the Data Bucket.
Each of these steps will be explained in more detail below.
Create a new Data Bucket
If you don’t have any Data Buckets created, click Start on the screen that says, “What is the Data Bucket?”
If you have at least one Data Bucket created, click Add at the top of the Data Bucket list.
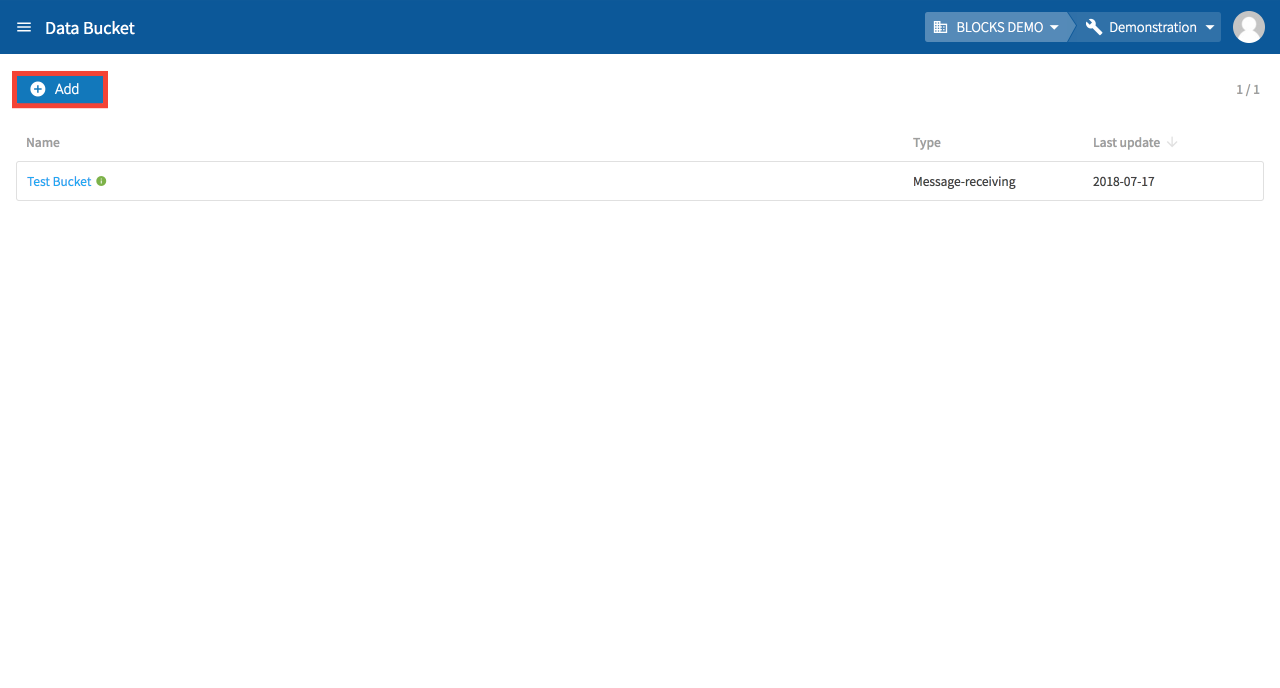
info_outline A message will appear if your organization does not have sufficient licenses to create the Data Bucket. If you are an admin for your organization, you will be prompted with instructions on how to to purchase an additional license. If you are not an admin, you will be prompted to contact your admins.
Select the type of Data Bucket to create and click Next.
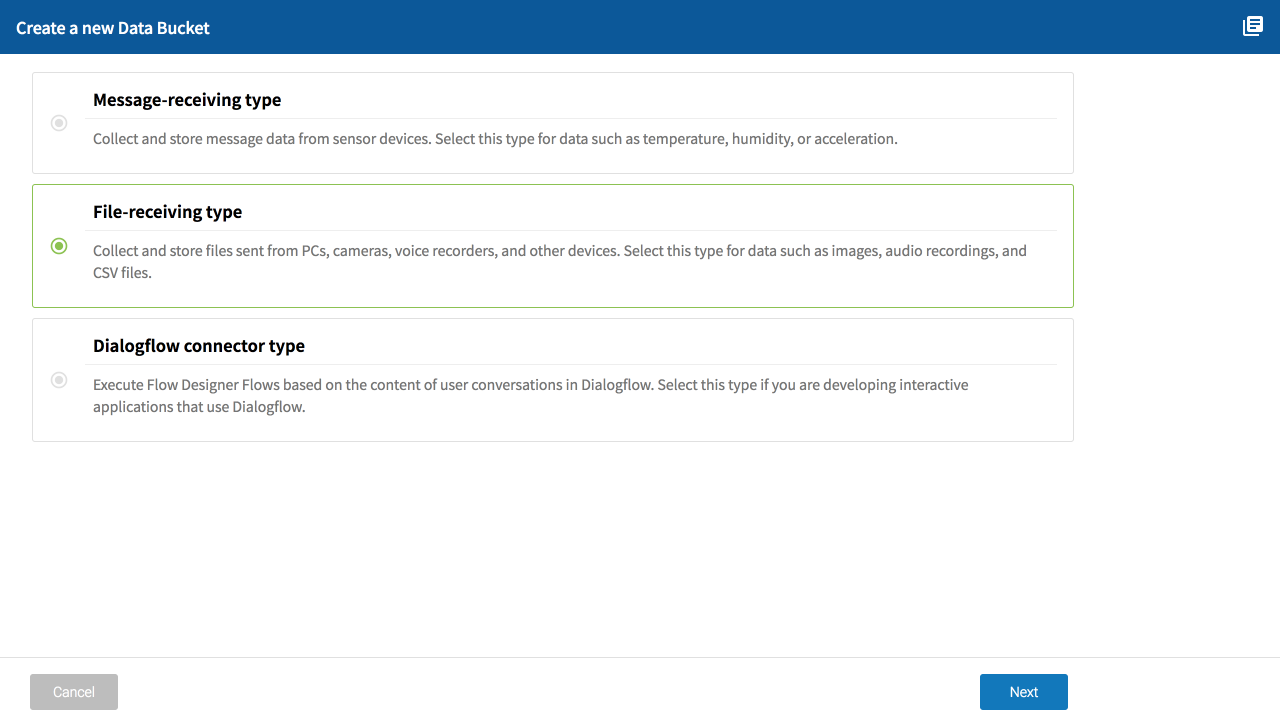
Refer to the following for information about each type:
| Type | Explanation |
|---|---|
| Message-receiving type |
|
| File-receiving type |
|
Enter a name for the Data Bucket.

Click Next.
GCP service account settings
info_outline This step is for Self-Service Plan users only.
In this section, you select your GCP service account and enable APIs required for using GCP services.
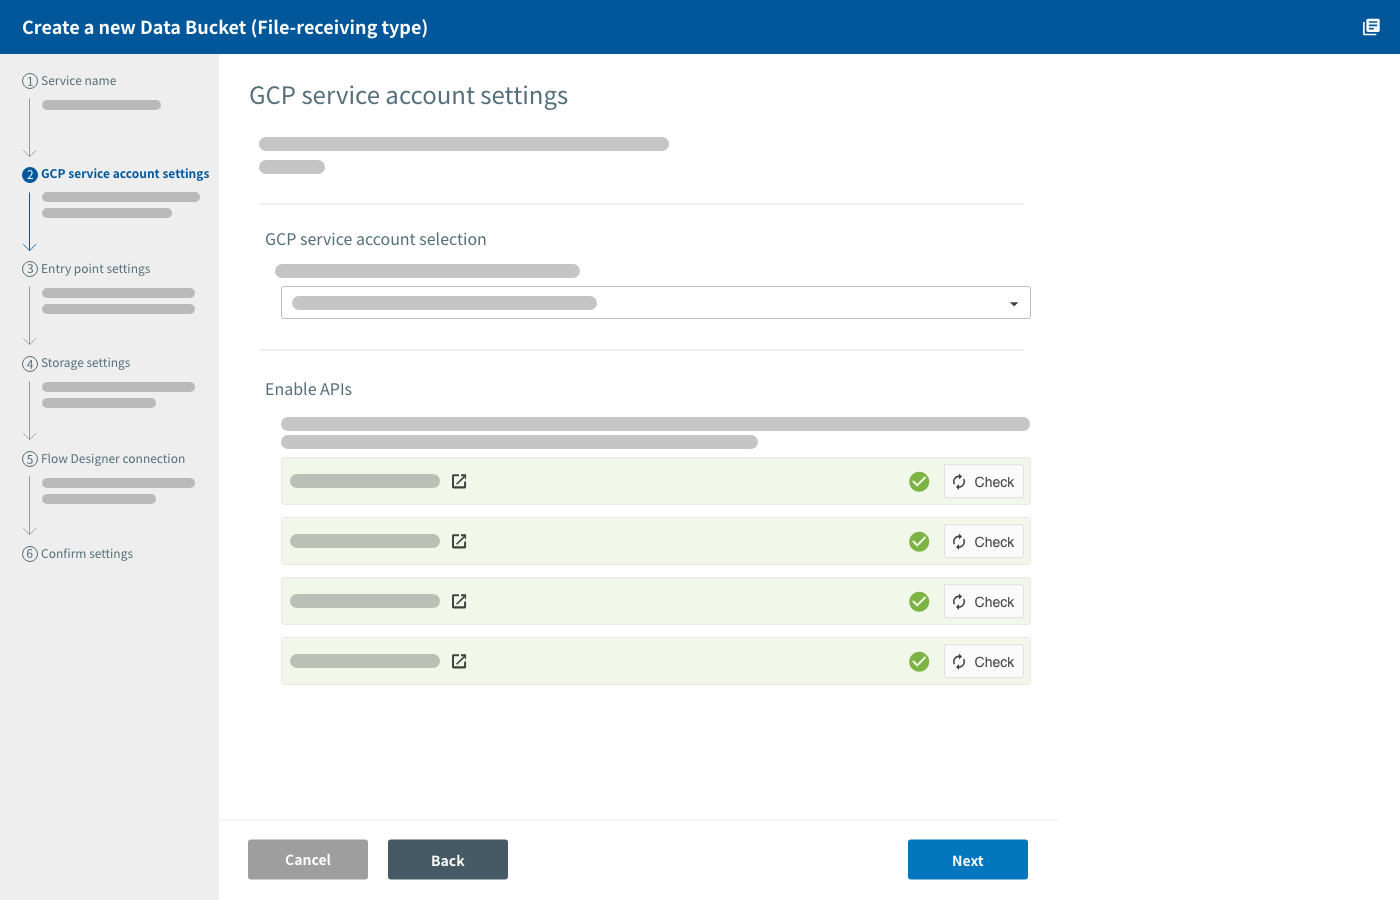
Select a GCP service account
BLOCKS automatically creates and manages the environment for the Data Bucket within your GCP project. A GCP service account with the Owner role is required for BLOCKS to be able to do this.
Select a GCP service account with the owner role.
info_outline For help creating a GCP service account, refer to Creating a Google Cloud Platform service account. The example on that page creates a service account with the “Editor” role, but GCP services accounts to be used with Data Buckets should be set to Owner.
Enable APIs
Do the following if there are any APIs that do not have a checkmark (check_circle) next to their loop Check button:
- Click Enable All APIs.
- The GCP console will open.
- Click Continue in the GCP console.
- Once the message The APIs are enabled appears, close the GCP console and return to BLOCKS.
Click loop Check for any API that does not have a checkmark (check_circle). Confirm that a checkmark appears for the API. Repeat this process for any APIs without a checkmark.
If the checkmark does not appear, try clicking loop Check again and waiting for a moment. This can sometimes take a bit of time. If the checkmark still does not appear, repeat the following:
- Wait a moment.
- Click loop Check.
If you still see a info_outline, the issue could be the following:
-
Your GCP service account is not set to the Owner role:
Open the menu (menu) in the upper-left corner of the GCP console open_in_new. Hover your cursor over IAM and admin and click IAM. Confirm that your service account’s role is set to Owner. If not, change it to owner.
-
Billing is not enabled for your GCP project:
Open the menu (menu) in the upper-left corner of the GCP consoleopen_in_new. Click Billing. If you haven’t already done so, enable billing for your project.
Click Next.
Entry point settings
In this section, you configure the entry point URL for your Data Bucket.
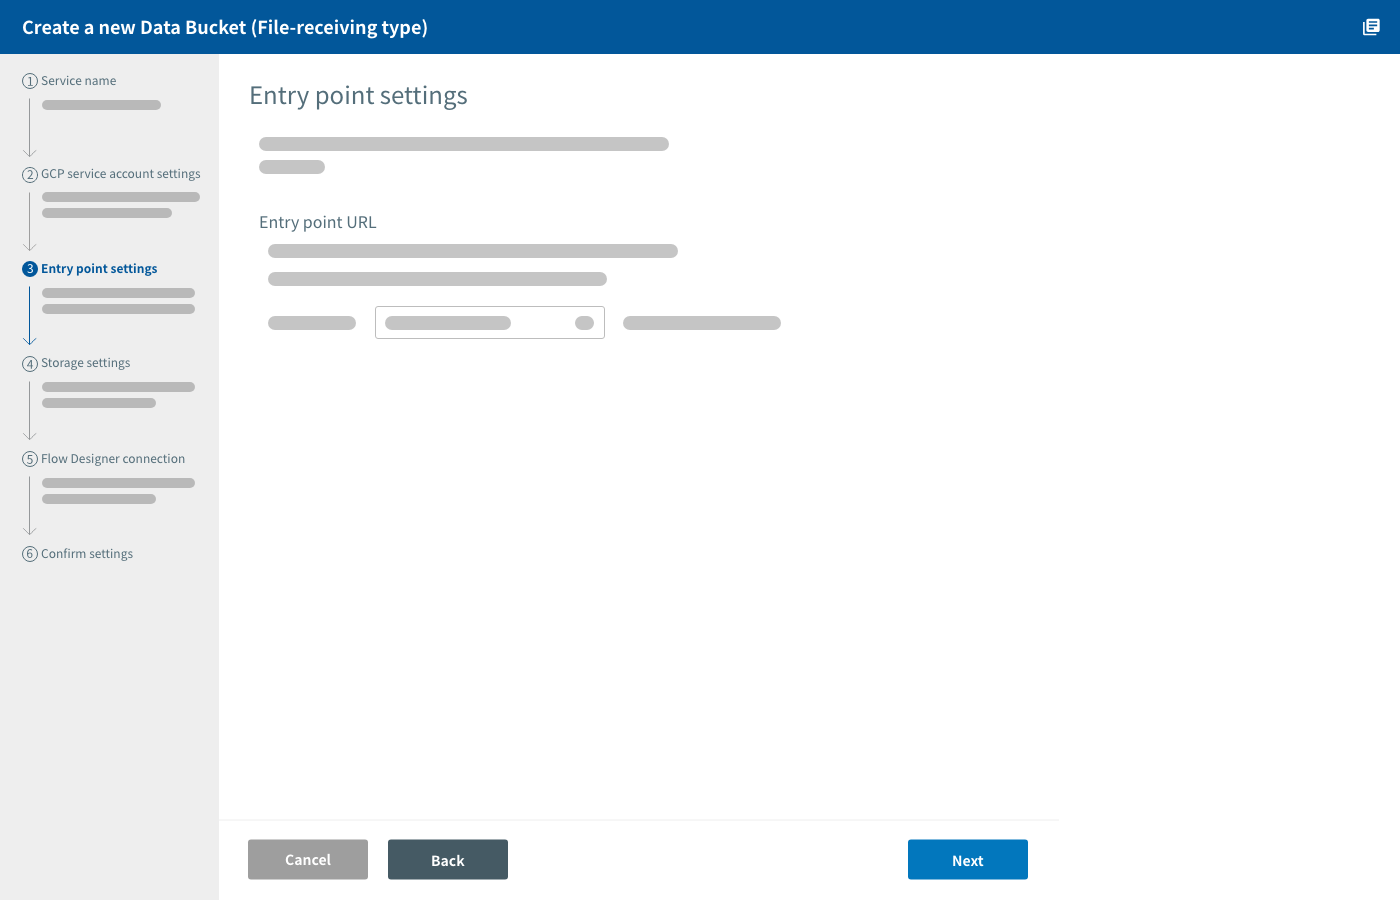
The entry point URL is where data is sent on its way from devices to the Data Bucket. Use the HTTP POST method to send data from devices to this URL.
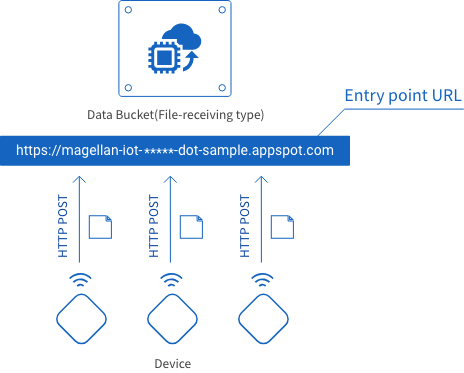
Entry point URLs are formatted as shown below. Only one portion can be configured by the user.
https://magellan-file-<*****>-dot-<Project ID>.appspot.com| Item | Explanation |
|---|---|
| <*****> |
A string of characters used to specify the Data Bucket’s entry point. You can configure this portion. It’s set as a random 16-character string by default.
When creating several Data Buckets for one GCP project, be sure not to use the same string more than once. |
| <Project ID> | This is set automatically to your GCP Project ID and cannot be changed. |
Click Next.
Storage settings
In this section, you configure settings for where the data will be stored. You can also configure saving file storage records (logs) into BigQuery.
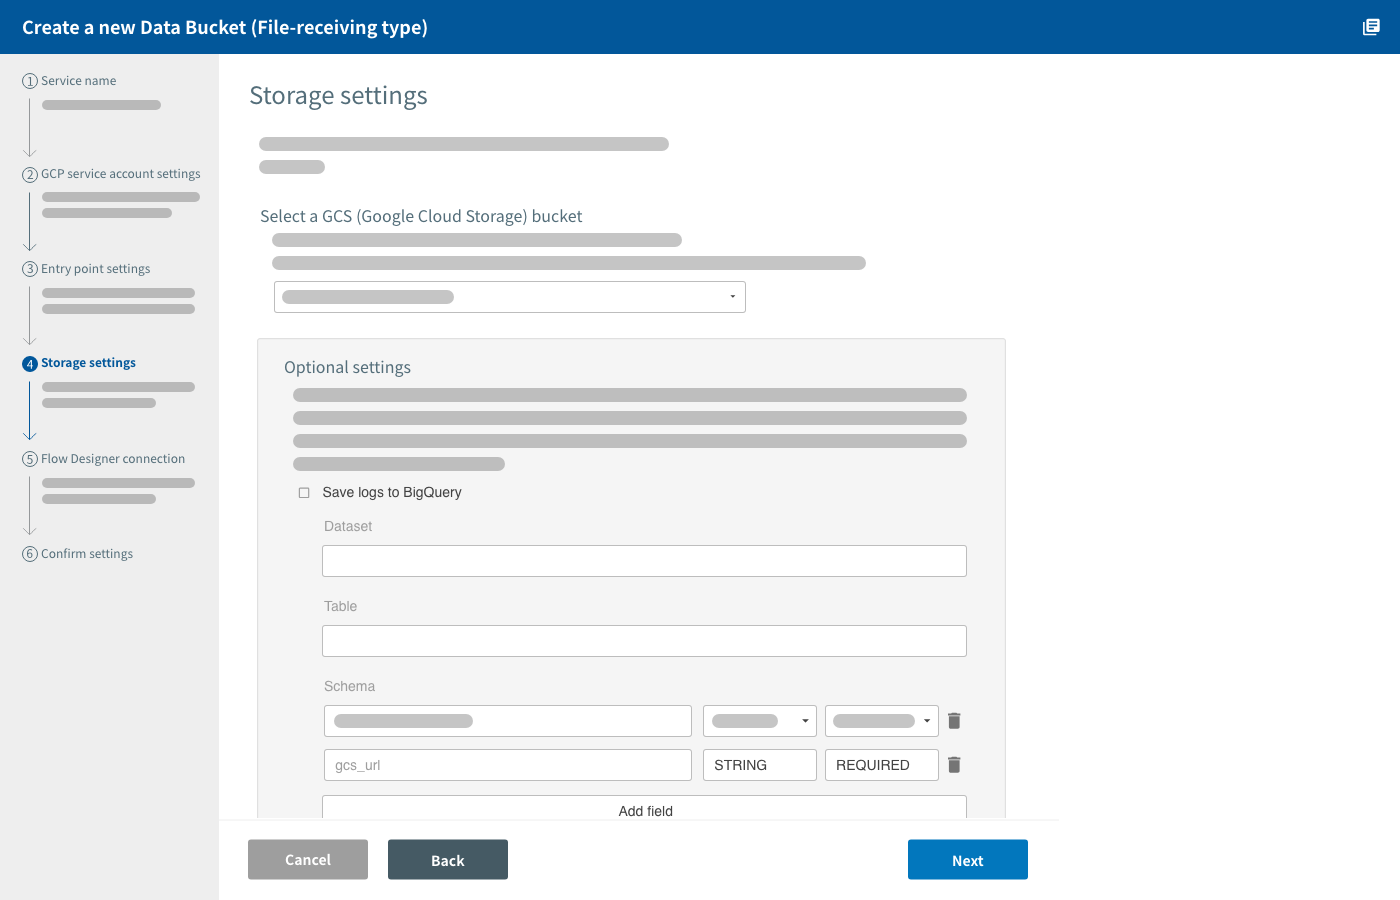
Under Select a GCS (Google Cloud Storage) bucket, select which bucket your data will be stored into. You must create buckets beforehand.
There is also an optional setting to save logs into BigQuery. Click Save logs to BigQuery and configure the BigQuery dataset and table that will store the logs.
The Data Bucket will automatically create your specified dataset and table if the ones you enter don’t already exist. Tables used by Data Buckets always include the fields gcs_url and timestamp.
| Field name | Data type | Explanation |
|---|---|---|
| gcs_url | STRING | The GCS URL of the saved file (gs://bucketname/filename) |
| timestamp | TIMESTAMP | The date/time the file was saved |
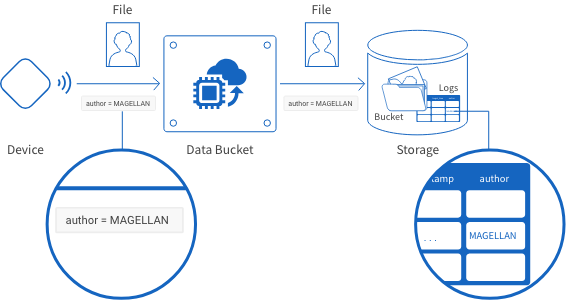
You can add more schema if there is other information you want to record into the logs. Include this info with the data you send to the Data Bucket with the following format: "Field name added under Schema" = "Information to be recorded".
For example, suppose we want to add a field called "author" to record a log of the file’s owner. By including the parameter "author=MAGELLAN" with the data we send from the device, the Data Bucket will record the value "MAGELLAN" into the table’s "author" field.
If you enter an existing table's name into the Table setting, BLOCKS will find the fields you enter into Schema within that table. An error will occur when BLOCKS attempts to store logs if the fields "gcs_url" and "timestamp" do not exist.
Click Next.
Flow Designer connection settings
In this section, you can configure to have a Flow in a Flow Designer execute automatically when your data is stored.
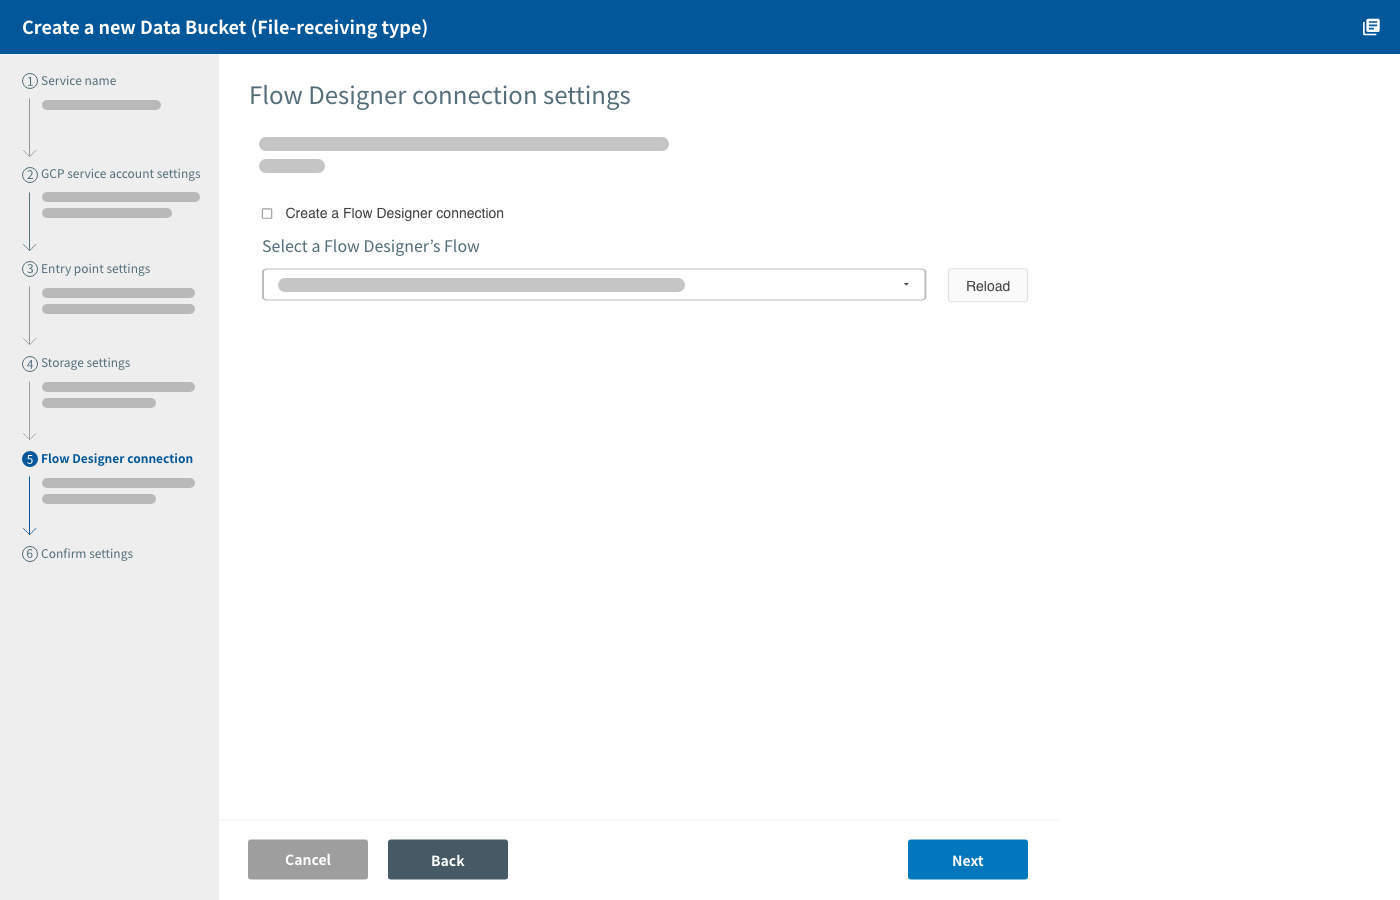
If you want to do this, click Create a Flow Designer connection and select the Flow you want to automatically execute.
The following parameters will be passed to the Flow.
| Parameter name | Explanation |
|---|---|
| gcs_url | The GCS URL of the saved file (gs://bucketname/filename). |
| target_time | The instant the file was saved in UTC (2016-10-13 12:39:10.234). |
| filename | File name of the saved file. |
Any other parameters included in the data will also be passed to the Flow.
warning An API token with a description of API Token For Data Bucket Service will be added to the Flow Designer you link to your Data Bucket. Make sure not to delete this token or the connection between the Data Bucket and Flow Designer will not work. You can change the API token's description later, if desired.
Click Next.
Confirm settings
In this section, you can review your settings before creating the Data Bucket.

If you find any mistakes, click the Back to return to the relevant settings screen. Once you have fixed everything, return to the Confirm settings screen and click Finish.
It will take a bit of time for the Data Bucket to be created. You’ll be taken to the Data Bucket’s details screen once it finishes.
Sending data to Data Buckets
When sending data to the Data Bucket, use the HTTP POST method to access its Entry point URL. Encode the data in the application/x-www-form-urlencoded format.
Data sent to the Data Bucket must include the following parameters (formatted as parameter name=value):
| Information to send | Parameter name | Value |
|---|---|---|
| API token | key | The "API Token" value from the Data Bucket details screen. |
| File name | filename | The file name to use when saving to GCS. |
| File data to send | content | Base64 encoded data. |
You can also send other parameters with your data. If you use the Flow Designer connection feature, the Data Bucket will also pass these parameters to the Flow you designate.
If you have configured fields other than the defaults to be saved as logs, give your parameters the same names as those fields.
For example, imagine the following scenario:
- We want to save a text file to GCS.
- The file name is sample.txt.
- The text file contains the string hello, world.
- We added the field author to be saved into the logs.
- We configured a connection with a Flow Designer's Flow.
- The Flow references data from an external source with the variable foo.
In this case, the data we send to the Data Bucket would be as follows (the HTTP header is only an example):
POST /upload HTTP/1.1
Content-Type: application/x-www-form-urlencoded

key=d29b76ac16181816ac7bd678&filename=sample.txt&content=aGVsbG8sIHdvcmxkCg%3D%3D&author=MAGELLAN&foo=bar
Each parameter is explained below:
| Parameter | Explanation |
|---|---|
| key=d29b76ac16181816ac7bd678 | The API token. |
| filename=sample.txt | The file name to be used when the data is stored to GCS. |
| content=aGVsbG8sIHdvcmxkCg%3D%3D | The data to be stored into GCS. After being encoded into Base64, the "hello, world" string is encoded once more into the application/x-www-form-urlencoded format. |
| author=MAGELLAN | An optional parameter. This parameter is being used to give the value MAGELLAN to the author field that we configured for our logs. This parameter will also be passed along to the linked Flow, where the value MAGELLAN can be referenced by the variable author. |
| foo=bar | An optional parameter. This parameter will be passed to the linked Flow where the value bar can be referenced by the variable foo. |
The Data Bucket will also send the parameters gcs_url, target_time, and filename to the linked Flow. For details, refer to Flow Designer connection settings.
check_box You can view your Entry point URL and API token on your Data Bucket's details screen. Click on your Data Bucket’s name in the Data Bucket list to access its details screen.
GCP service charges
Data Buckets create an environment within your GCP project that makes use of several GCP services.
As such, GCP service charges will apply separately from MAGELLAN BLOCKS fees. These charges vary depending on the service. For details, refer to the pricing page for each service used by Data Buckets.
How to use Data Buckets
In this section, we’ll demonstrate how to send an image file to a Data Bucket and automatically execute a Flow Designer's Flow to analyze the image.
Data Bucket and Flow Designer overview
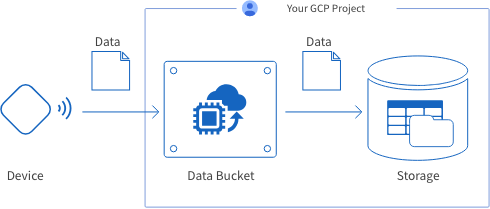
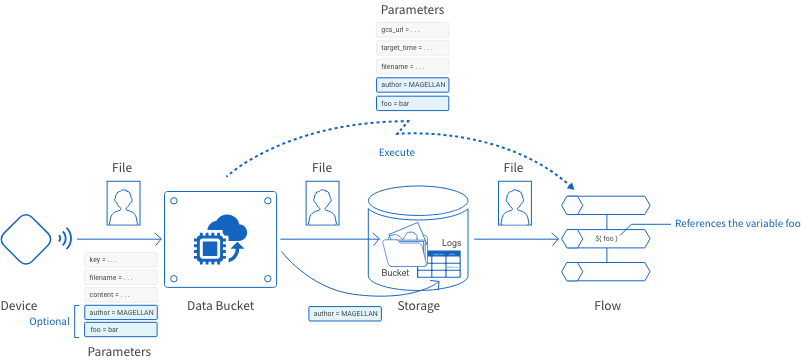
The following image below shows an overview of how we will link our Data Bucket and Flow Designer.

- First, a device will send the image file to the Data Bucket. The device will include a parameter about the file’s owner with the data (
author=MAGELLAN). - The Data Bucket will save the image file into a GCS bucket. It will also save the owner information into a log in BigQuery.
After the file has been saved to GCS, the linked Flow will execute in the Flow Designer. - Within the Flow, the Image analysis BLOCK will perform color analysis on the saved image, then output the results to the logs section of the Flow Designer with the Output to log BLOCK.
Preparing the Data Bucket and Flow Designer
First, we’ll create the following Flow in a Flow Designer. We’ve omitted the Start of Flow and End of Flow BLOCKS from the chart.
| # | BLOCK | Settings |
|---|---|---|
| 1 | Image analysis |
|
| 2 | Output to log |
|
| 3 | Output to log |
|
Next, we’ll create a Data Bucket with the settings shown below. You can change specific values like bucket and table names if you are following along to test this out yourself.
| Screen | Item | Contents |
|---|---|---|
| Entry point settings | Entry point URL | Leave as default. |
| Storage settings | GCS bucket | Set to magellan-iot-sample. |
| Logs |
Check the box to save logs to BigQuery.
|
|
| Flow Designer connection settings | Connection | Select the Flow described above that contains the Image analysis and Output to log BLOCKS. |
Testing it out
We'll send the following image to the Data Bucket and have it analyzed for dominant colors.

We’ll use Unix-based "curl" and "base64" commands in the terminal to send the file.
First, we'll prepare the image by executing the following command:
curl https://storage.googleapis.com/blocks-docs/basic-guide/image_properties_sample.jpg | base64 -o sample.jpgThe "curl" command downloads the sample image, then the "base64" command encodes it into Base64. Finally, the file name is set to "sample.jpg".
Next, we'll send the image file to the Data Bucket with the following curl command. Since the API token ("key" parameter) is unique to each Data Bucket, be sure to use your Data Bucket’s API token if you test this out on your own.
curl --data key=d29b76ac16181816ac7bd678 --data filename=sample.jpg --data-urlencode content@sample.jpg --data author=MAGELLAN https://magellan-iot-2edblhnt-dot-magellan-iot-sample.appspot.com/uploadRunning that command will send the image file to the Data Bucket, which will then save it into GCS. This will cause the Flow on the Flow Designer to execute, which will analyze the colors of the image and output a log of the results. The following are some example logs from running the command:
[2016-10-14 18:56:29.184]  info : Job-16 start
[2016-10-14 18:56:29.223]  info : VersatileVisionApi step start
[2016-10-14 18:56:29.234]  info : VersatileVisionApi: annotate for file gs://magellan-iot-sample/sample.jpg start
[2016-10-14 18:56:30.724]  info : VersatileVisionApi: annotate for file gs://magellan-iot-sample/sample.jpg finished
[2016-10-14 18:56:30.738]  info : VersatileVisionApi step finished
[2016-10-14 18:56:30.778]  info : Print step start
[2016-10-14 18:56:30.794]  info : Variable: '_'
{
  "imagePropertiesAnnotation": {
    "dominantColors": {
      "colors": [
        {
          "pixelFraction": 0.03975622,
          "color": {
            "green": 23,
            "blue": 24,
            "red": 19
          },
          "score": 0.15343559
        },
        {
          "pixelFraction": 0.25660831,
          "color": {
            "green": 213,
            "blue": 130,
            "red": 156
          },
          "score": 0.089890622
        },
        {
          "pixelFraction": 0.0071575367,
          "color": {
            "green": 243,
            "blue": 245,
            "red": 234
          },
          "score": 0.044020534
        },
        {
          "pixelFraction": 0.0072284034,
          "color": {
            "green": 165,
            "blue": 124,
            "red": 131
          },
          "score": 0.030882463
        },
        {
          "pixelFraction": 0.02898448,
          "color": {
            "green": 52,
            "blue": 54,
            "red": 46
          },
          "score": 0.10213716
        },
        {
          "pixelFraction": 0.027141945,
          "color": {
            "green": 85,
            "blue": 89,
            "red": 76
          },
          "score": 0.085689932
        },
        {
          "pixelFraction": 0.018425342,
          "color": {
            "green": 119,
            "blue": 122,
            "red": 109
          },
          "score": 0.053121205
        },
        {
          "pixelFraction": 0.17454468,
          "color": {
            "green": 209,
            "blue": 101,
            "red": 144
          },
          "score": 0.036085345
        },
        {
          "pixelFraction": 0.0090000713,
          "color": {
            "green": 116,
            "blue": 136,
            "red": 107
          },
          "score": 0.033624593
        },
        {
          "pixelFraction": 0.028913613,
          "color": {
            "green": 237,
            "blue": 153,
            "red": 184
          },
          "score": 0.030864337
        }
      ]
    }
  },
  "gcs_url": "gs://magellan-iot-sample/sample.jpg",
  "timestamp": 1476438988.0
}
[2016-10-14 18:56:30.809]  info : Print step finished
[2016-10-14 18:56:30.852]  info : Print step start
[2016-10-14 18:56:30.871]  info : Variable: 'author'
"MAGELLAN"
[2016-10-14 18:56:30.885]  info : Print step finished
[2016-10-14 18:56:30.926]  info : Job-16 finished