Model Generator Help
Introduction
This page explains each of the steps involved in creating Model Generators and running trainings. Each Model Generator setup screen contains a link to a section of this page.
What is the Model Generator?
The Model Generator is a MAGELLAN BLOCKS service designed to make Machine Learning simple and accessible for everyone.
You can divide Machine Learning with BLOCK into two main steps: training and prediction.
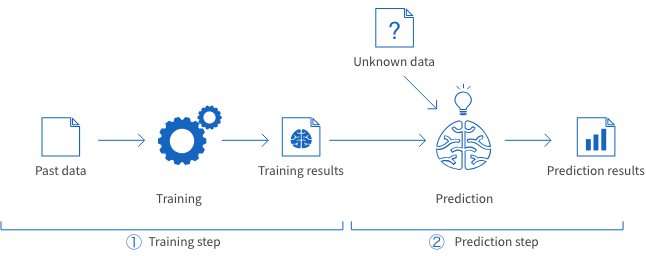
-
For the training step, you can use the Model Generator. It “learns” from past or known data to create a trained model.
-
For the prediction step, you use the trained model is to make predictions based on new data.
You can do this on a Flow Designer using either the BLOCK or the Model Generator prediction (batch) BLOCK.
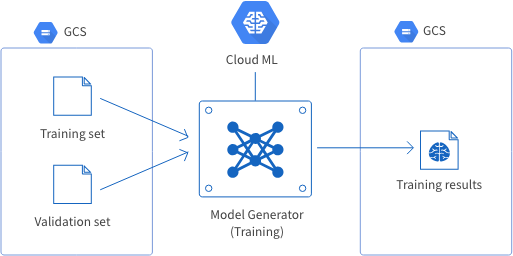
Within the Model Generator, we refer to the training step simply as a training. During a training, the Model Generator uses data split into a training set and a validation set to train and optimize its model. You can create training and validation sets by splitting up your data beforehand, or have the Model Generator do this for you automatically.
info_outline The Model Generator uses the Google Cloud Machine Learning Engine open_in_new to implement its Machine Learning functions.
Types of Model Generator
There are several types of Model Generator for various Machine Learning models. Each type currently available is explained below:
Classification
The classification model predicts which category data belongs to. Some example use cases include:
- Categorizing which people are likely to not register (0) or register (1) for a membership campaign.
- Categorizing which people are likely to not click (0) or click (1) an ad on a website.
- Categorizing users into various groups (0 to n) based on their interests.
- Categorizing whether credit card or ATM usage is normal (0) or fraudulent (1).
Regression
The regression model predicts a numerical value, often based on input data like weather, day of the week, and the like. Some example use cases include:
- Predicting the number of attendees to an event.
- Predicting the number of sales of a product.
- Predicting the number of passengers.
Feature vector extractor (alpha)
This type is similar to the classification model, but it outputs vectors expressing the data’s features.
error_outline This service is currently in alpha and models made during the alpha period may become unsuable after the official version is released. Please use the official version once it is released.
As an alpha release, there’s the chance that some things may not work as intended. We appreciate your feedback regarding bugs or ways to improve MAGELLAN BLOCKS.
If you would like to request access to the limited alpha for this service, please contact us.
Image classification
The image classification model categorizes images based on their content. Some example use cases include:
- Categorizing images of dogs as bulldogs, poodles, or dachshunds.
- Categorizing images of cats as Persians, Siamese, or Scottish folds.
- Categorizing images of sushi as tuna, salmon, or shrimp.
Object detection: manual setup
This model detects what objects are contained within images. It can detect multiple objects at the same time.

For this type of model, you apply labels for objects contained in your training images.
GCP service account settings
info_outline This section only applies to Self-Service Plan users.
In this section, you will select your GCP service account and enable APIs required to use Google Cloud Machine Learning.

Select a GCP service account
The Model Generator creates and uses an environment within your GCP project. As such, it needs to be given permission to access your project. This is done using a GCP service account.
Enable APIs
Do the following if there are any APIs that do not have a checkmark (check_circle) next to their loop Check button:
- Click Enable All APIs.
- The GCP console will open.
- Click Continue in the GCP console.
- Once the message The APIs are enabled appears, close the GCP console and return to BLOCKS.
Click loop Check for any API that does not have a checkmark (check_circle). Confirm that a checkmark appears for the API. Repeat this process for any APIs without a checkmark.
If the checkmark does not appear, try clicking loop Check again and waiting for a moment. This can sometimes take a bit of time. If the checkmark still does not appear, repeat the following:
- Wait a moment.
- Click loop Check.
If you still see a info_outline, the issue could be one of the following:
-
Your GCP service account is not set to the Editor role:
Open the menu (menu) in the upper-left corner of the GCP consoleopen_in_new. Hover your cursor over IAM and admin and click IAM. Confirm that your service account’s role is set to Editor. If not, change it to editor.
-
Billing is not enabled for your GCP project:
Open the menu (menu) in the upper-left corner of the GCP consoleopen_in_new. Click Billing. If you haven’t already done so, enable billing for your project.
Storage settings
info_outline This section applies to Self-Service Plan users only.
In this section, you will configure settings for the Google Cloud Storage (GCS) bucket and directory that will contain your training results.
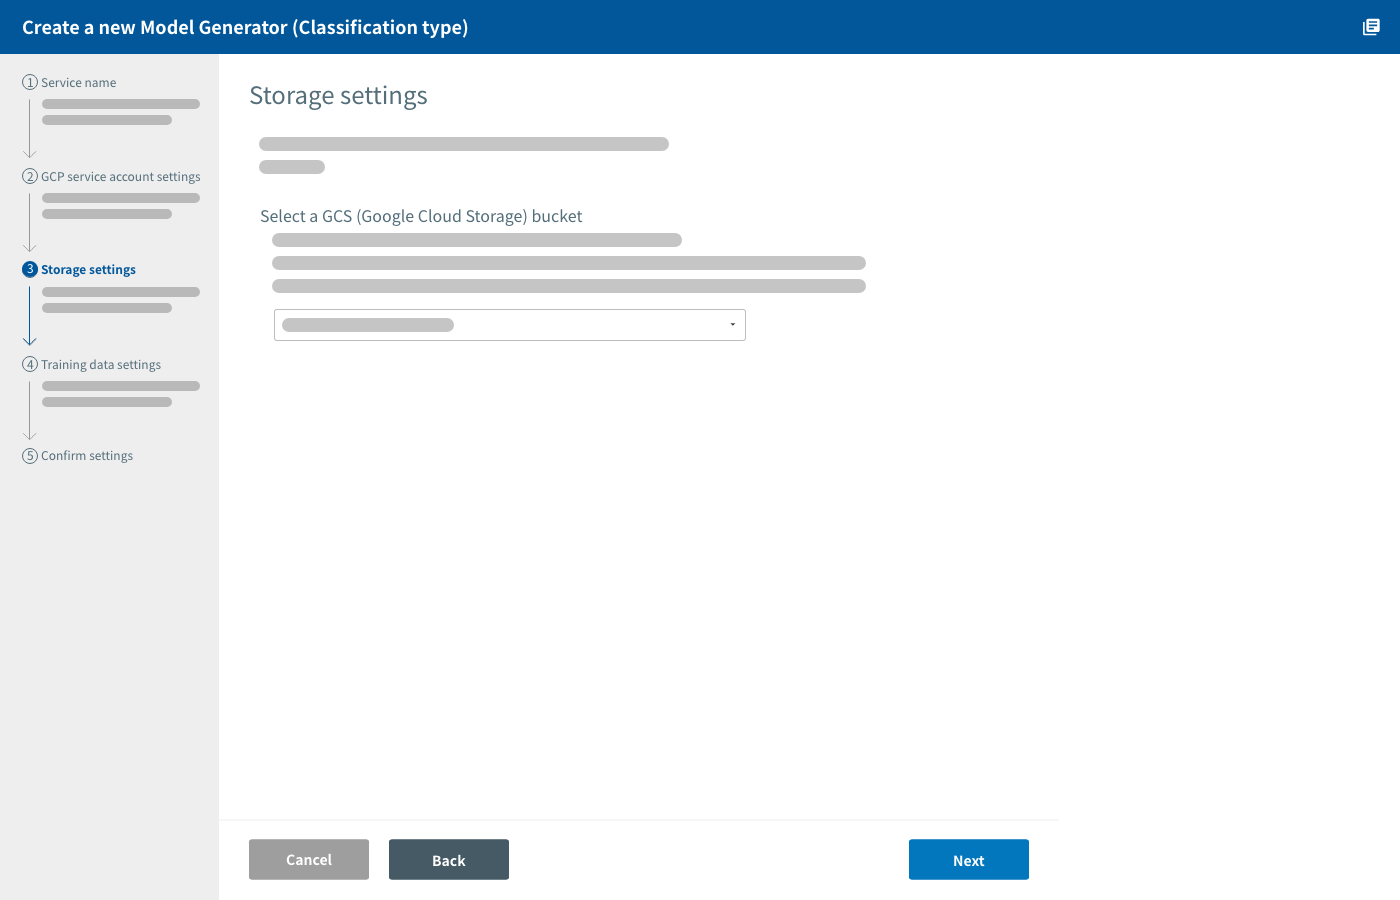
Select GCS bucket
Prepare a bucket for the Model Generator to use, then select this bucket from the list. Please use the following settings when creating buckets to use with Model Generators:
| Option | Value |
|---|---|
| Default storage class | Regional |
| Location | us-central1 |
Setting the directory within the GCS bucket
Each Model Generator you create will use a different GCS directory within your bucket. You don’t need to create these directories in advance. The directory will be created with the name designated in this setting.
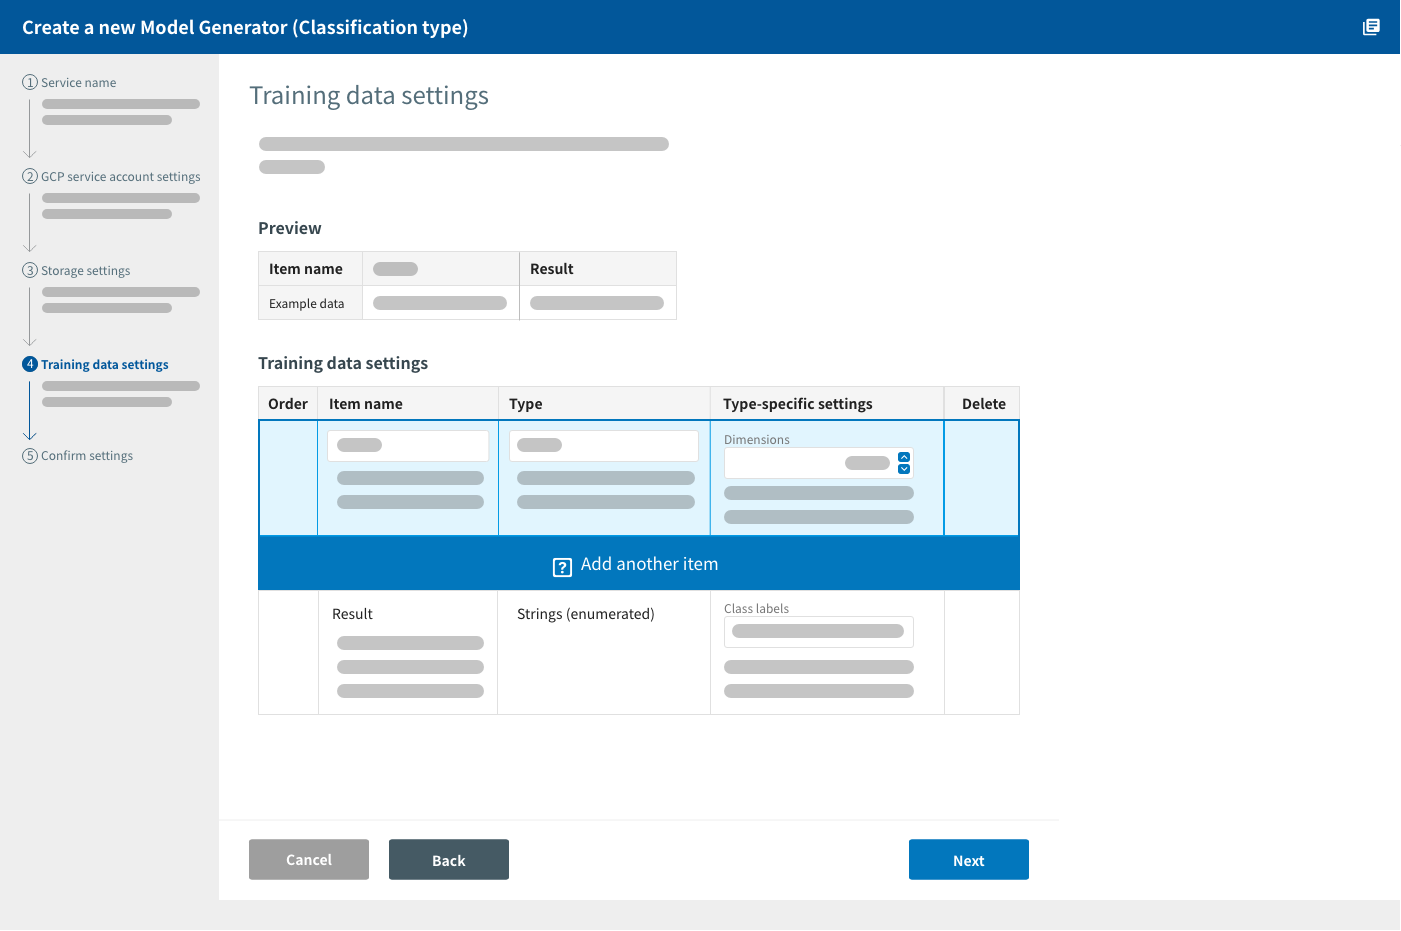
Training data settings
You will configure settings for the training data on this screen.
Prepare your training data as CSV files (UTF-8 with no BOM open_in_new) with commas as the field delimiter character.
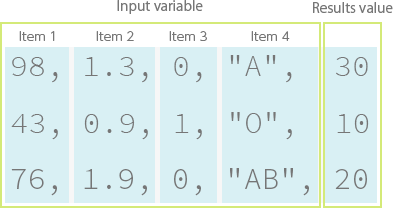
- Training data should consist of a set of at least one input variable and a results value. In the classification model’s case, the results value refers to the “answer value”. It refers to the “actual result” for the regression model.
- Align each row as a set of input variables and the results value.
- Order each row with the input variables first, followed by the results value.
- The results value is a string for the classification model, and a numerical value for the regression model.
- If you prepare separate files for the training set and validation set, both files must be formatted in the same way.
- If you prepare your training data as one file, BLOCKS can automatically separate it into the training set and validation set using an approximately 8:2 ratio.
Input variable settings
Click add Add another item and enter information such as name and type for each input variable in your training data.
When using training data created in the DataEditor, you can click Auto Set From Table and select your data to have BLOCKS automatically set your input data settings. It can also automatically set the keyword list for string (enum) type data. It will use the “Approx. number” setting if the data contains over 10,000 different types of strings.
| Setting | Explanation |
|---|---|
| Order |
You can reorder a data item you have entered by clicking arrow_upward or arrow_downward. |
| Name |
Enter a name for the data item. You can use letters, numbers, or underscores ( info_outline If you will use BigQuery for your input data or plan to use Flow Templates, there are certain reserved words in BigQuery that you should avoid using here. Refer to the BigQuery documentation’s Standard SQL Lexical Structure: Reserved Keywords page for a list of the reserved words. |
| Type | Select the data type as numerical value, month, day of the week, Boolean, string (enum), or sequence. See the table below for more information on each data type. |
| Type-specific settings |
There are additional settings required depending on the selected data type.
See the table below for a more detailed explanation of each setting. |
| Delete |
Delete the data item by clicking delete. |
Data types:
| Type | Explanation | ||||||
|---|---|---|---|---|---|---|---|
| Numerical value | Integers or decimal numbers. You can also configure the number of dimensions when this type is selected. Dimensions refer to the number of numerical values within an item. For example, if you had the following data: 98,1.3,0,"A" and wanted to treat the 98,1.3 portion as one item, you set the dimensions setting to 2.
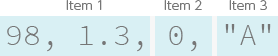
|
||||||
| Month | Integers indicating the month. The range can be either 0–11 or 1–12. | ||||||
| Day | Integers indicating the day of the week. The range is 0–6. | ||||||
| Boolean |
Select this type for data with two possibilities, such as true or false. Data in this type must be entered as the numbers 0 or 1. This type can be used in situations like the following:
The way the above use 0 and 1 is just an example. You could also switch the values (ex. holiday = 0, non-holiday = 1). |
||||||
| Strings (enumerated) |
String data. You can further select between a Keyword list or Approximate number.
info_outline Space characters ( |
||||||
| Sequence |
Select this type for a list of numerical values whose order has significance. info Only one sequence can be set per training data. Assume that we want to train a model to make predictions based on the previous week’s climate data (minimum temperature, maximum temperature, precipitation) as shown in the image below. 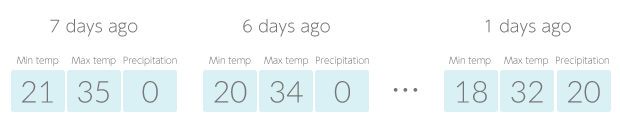
In this case, we use the sequence type because the ordering of the climate data sets (7 days ago, 6 days ago… 1 day ago) has significance. Next, we set the “Number of elements (length)” and the “Dimensions per element (channels)” for the sequence. The “Number of elements” is the number of items that have significance in their order. This would be set to 7 for our example, since there are 7 days of climate data in our sequence. 
“Dimensions per element” refers to the number of types of data within each element. In our example, we have 3 types of climate data in each element. 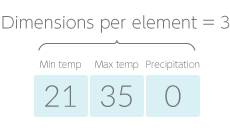
info This example uses a chronological sequence, but that is not a requirement. Any sequence of numbers for which the order has significance can be used. The data used in this example would be written in a CSV file as shown in the image below. 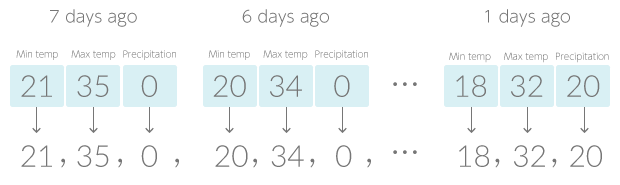
|
Class labels setting
When creating a classification model, you must enter a list of the results values, or class labels.
Enter a label into the field and click Add. You can enter multiple labels at once as a comma-separated list (ex: Iris-setosa, Iris-versicolor, Iris-virginica).
If you used Auto set from table to set your data items, you can click the menu icon (more_vert) then click Auto set from table to automatically set your class labels. If you had already entered labels, this will overwrite them.
Click delete next to a label to delete it.
Output dimensions
When creating a regression model, you must configure the output dimensions of the results value.
As an example, if your model predicts for geographical location data with latitude, longitude, and altitude, the output dimensions would be 3.
Feature vector dimensions (alpha)
When creating a feature vector extractor model, you must configure the number of dimensions (1–100) for the vectors of the data’s features that will be output.
error_outline This service is currently in alpha and models made during the alpha period may become unsuable after the official version is released. Please use the official version once it is released.
As an alpha release, there’s the chance that some things may not work as intended. We appreciate your feedback regarding bugs or ways to improve MAGELLAN BLOCKS.
If you would like to request access to the limited alpha for this service, please contact us.
Using JSON text to enter training data settings
You can enter your training data information directly as JSON text.
Under Data items, click Edit directly by JSON and enter your JSON text into the field that appears.
Click Edit by form to switch back to the GUI for entering data items.
JSON text for training data should follow these specifications:
- Enter training data information as an array (
[item 1, item 2, ..., item n]). Order each item in the array in the same order as the columns in the training data CSV file. - Enter each data item as an object (
{...}). Follow the guidelines below for setting each member of the object:- Name: Set as
"name": "ITEM NAME". - Type: Set as
"type": "TYPE". The"TYPE"can be one of the following:Type Value set for "TYPE"Type-specific additional data Numerical value "number"Set dimensions as
"count": DIMENSIONSMonth "month"None
Day of the week "weekday"None
Boolean "boolean"None
String (enum) "enum"Set a keyword list as
"keys": "KEYWORD LIST".Set an approximate number as
"size": APPROX. NUMBER.Sequence "conv1d"Set the number of elements (length) as
"length": NUMBER OF ELEMENTS (LENGTH).Set the dimensions per element (channels) as
"channel": DIMENSIONS PER ELEMENT (CHANNELS).
- Name: Set as
The following is an example of JSON text for training data settings:
[
  {
    "type": "number",
    "name": "item1",
    "count": 1
  },
  {
    "type": "month",
    "name": "item2"
  },
  {
    "type": "weekday",
    "name": "item3"
  },
  {
    "type": "boolean",
    "name": "item4"
  },
  {
    "type": "enum",
    "name": "item5",
    "keys": "A, B, O, AB"
  },
  {
    "type": "enum",
    "name": "item6",
    "size": 100
  },
  {
    "type": "conv1d",
    "name": "item7",
    "length": 3,
    "channel": 1
  }
]
Label settings
For the object detection: manual setup Model Generator, you must label your training images before running the training.
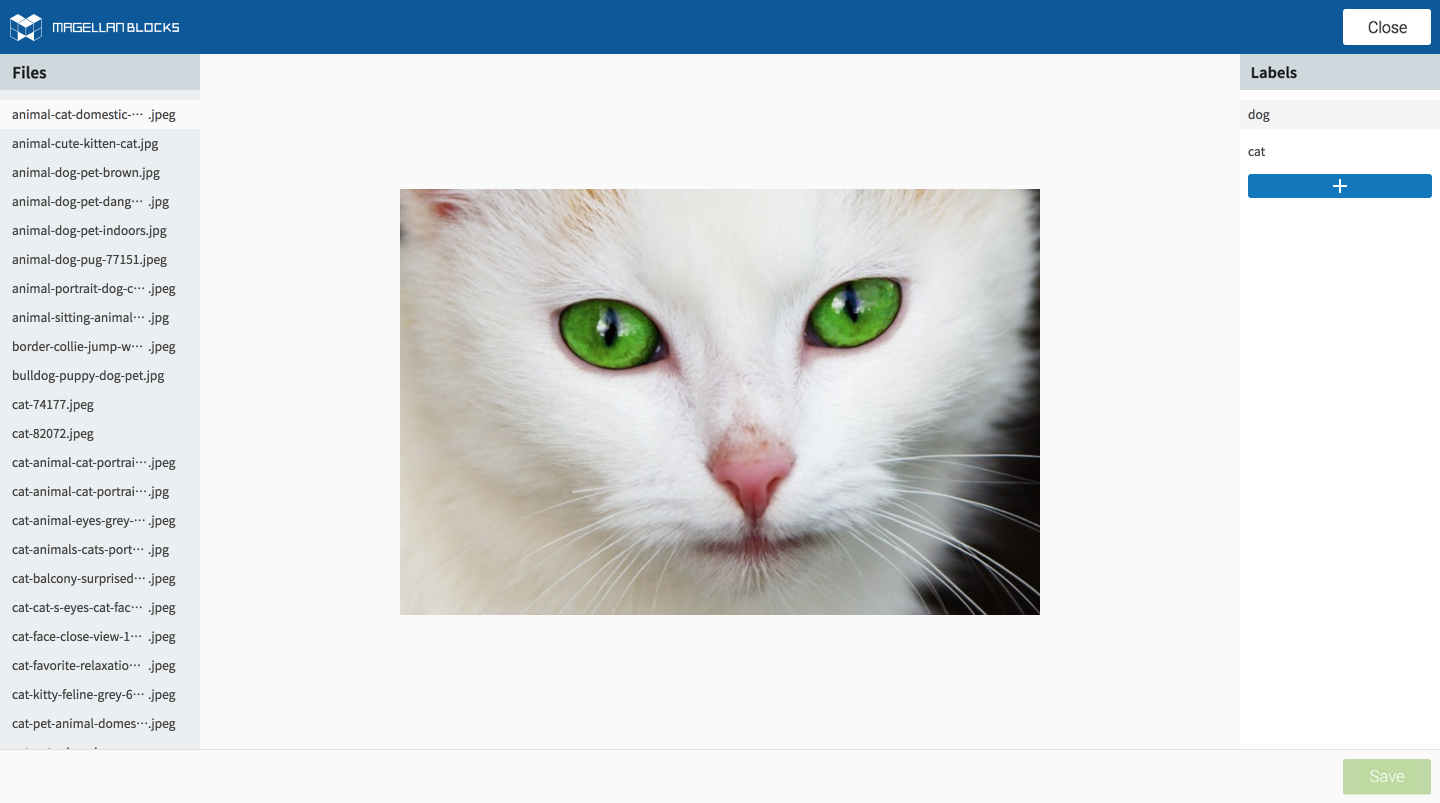
For example, the labels dog and cat have been added to the following image:
In this section, you will register the labels that you will use on your training images. For the example image above, you would register the labels dog and cat.
To register labels, enter them into the field and click add_box. You can enter a comma-separated list (example: dog, cat) to add multiple labels at the same time.
You must adhere to the following naming rules for labels:
- Use only letters, numbers, or underscores (
_) - Must be within 64 characters
To delete a label, click the trash icon (delete) to its right.
info_outline You cannot add or delete labels after a Model Generator has been created.
Training details screen
The following can be performed on this screen:
- Manage image labels (object detection: manual setup model only)
- Start a training
- See a list of trainings
- Check a training’s details
- Check information about the Model Generator
- Delete the Model Generator

Managing image labels
For the object detection: manual setup model, you need to apply labels to your images before starting the training.
Applying labels to an image refers to creating rectangular boundaries with names (labels) around the objects in the image. You can apply labels for multiple objects within a single image.
You should prepare the training images that you will label into a single, flat GCS folder (cannot contain subfolders).
error_outline You should use at least 100 labelled training images. Using fewer training images may cause the training to fail.
How to label images
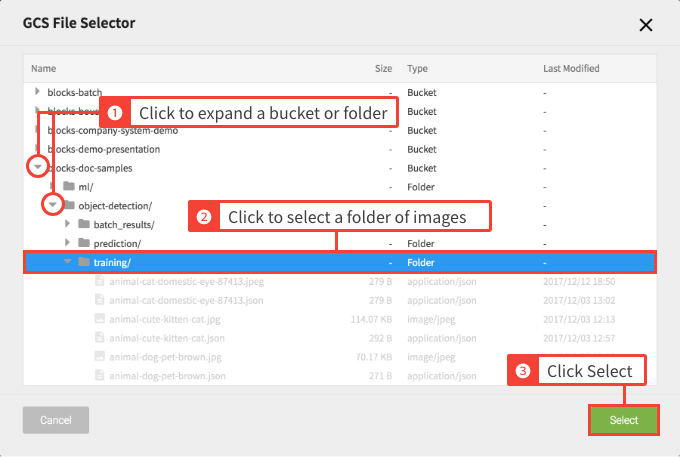
- Click Add Label.
-
Choose the GCS folder that contains your images and click Select.
-
Next, the label application screen will appear.
-
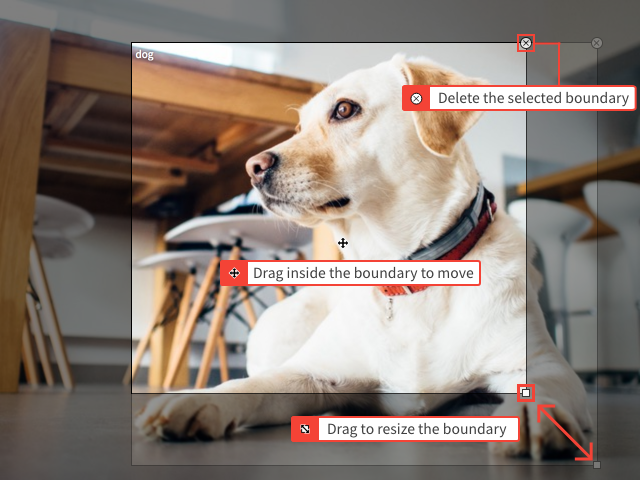
On the label application screen, select an image and label, then drag your mouse to create a boundary around the corresponding object in the image.
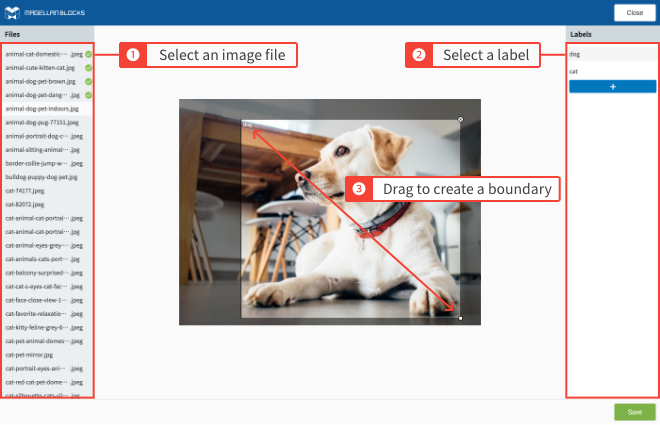
- Delete a boundary by clicking the × in its upper-right.
- Resize a boundary by dragging the square marker in its bottom-right.
- Move a boundary by dragging from within it.
info_outline You can also add more labels to the label list by clicking the add_box button. Enter the new label into the field that appears and click Add.
-
Click Save to save the applied labels.
Files you have labelled will have a checkmark (check_circle) in the file list.
-
Repeat this process for all of the training images in the list.
-
Once finished, click Close.
Start a training
Click Start Training to create a new training.
You can configure the required settings for a new training and start it from this screen.
Training list
A list will be displayed here when you have created at least one training. The following information is contained in the training list:
| Information | Explanation |
|---|---|
| Training name | Configured in the Start Training settings. You can view the details screen for a training by clicking on its name. |
| Started | Shows the date and time when the training began. |
| Finished | Shows the date and time when the training finished. |
| Status | Shows the training’s status. Possible statuses are: Preparing, Running, Succeeded, Failed, and Stopped. |
| RMSE/Accuracy | Shows the results of evaluating the training. For the classification model, this refers to its accuracy in selecting the correct class. For the regression model, it refers to its RMSE (Root Mean Square Error), which is a measure of the difference between the actual results and the predicted results. |
| Actions |
Stop a training that is running or apply a completed training to use for making predictions. When you apply a training, you can use it for making predictions in a Flow Designer with the Model Generator prediction (online) BLOCK or the Model Generator prediction (batch) BLOCK. You can select to apply your training to Production or Testing. With this option, you can apply the Testing version to verify your model, then apply the Production version for your actual implementation. You can only apply one Production or Testing version at a time. You can also switch between which version is applied (Production to Testing and vice versa). |
| more_vert |
Click the more_vert icon on the right-side of a training to open an options menu. 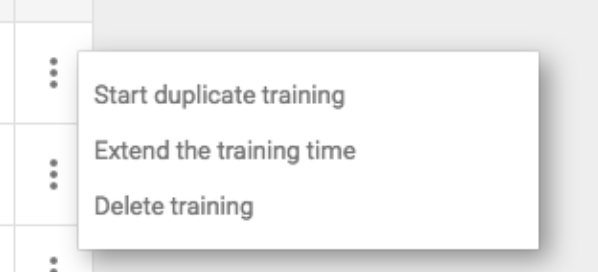
You can do the following from this menu:
|
Show training details
You can view the details screen for a training by clicking on its name.
| Item | Explanation |
|---|---|
| Training results |
View the training start time, end time, status, and accuracy/RMSE. The image classification type may also show Incorrectly classified images. When training, the image classification model automatically splits the data in the image folders with an approximate ratio of 8:2 for training and validation data. It uses the training data to learn, then tests itself using the validation data. If its classifications are incorrect during this validation phase, the mistakes will be shown under Incorrectly classified images. If Incorrectly classified images is displayed, please check that there are no problems in the images themselves. If there are, make sure the images are in the correct folder or delete the images with errors and try running a new training. If the incorrectly classified images do not contain any problems, you can leave them as they are. |
| Settings |
Shows the settings you configured in when starting your training as well as the training’s runtime version. Please be aware that runtime versions have an expiration date. Refer to usage limits for more details. |
| Error logs | Shows the error logs when a training fails. Refer to these if you want to examine why the training failed. |
Confirm the Model Generator’s settings
You can view various information about a Model Generator under the Settings section of its details screen.
| Item | Explanation |
|---|---|
| Service name | The name you configured on the Create a new Model Generator screen. |
| Type | The model type you selected on the Create a new Model Generator screen. |
| GCP service account | The GCP service account used by the Model Generator. |
| Model name | The model name for the training results. |
| Training data settings | The information configured on the Training Data Settings screen. |
Delete a Model Generator
You can delete a Model Generator by clicking Delete at the bottom of its details screen.
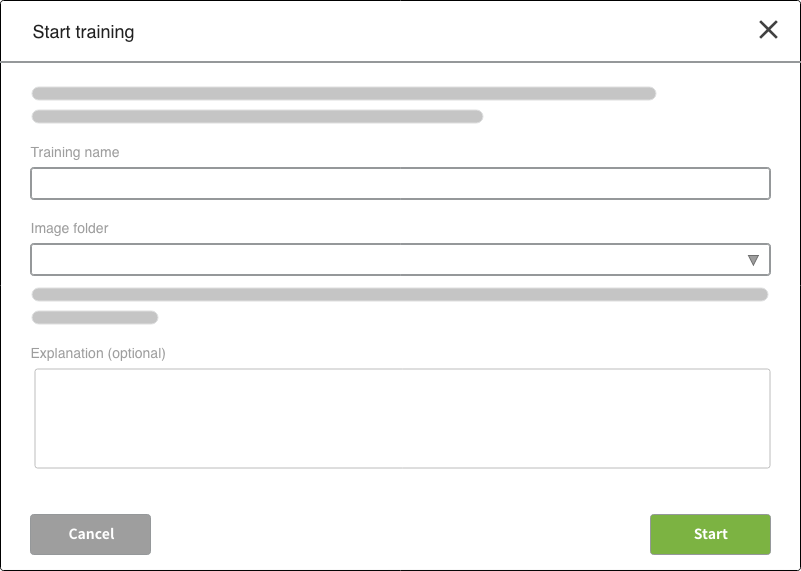
Start training screen help
You can configure settings necessary to create and start a new training on this screen.
Classification, regression, and feature vector extractor (alpha) models
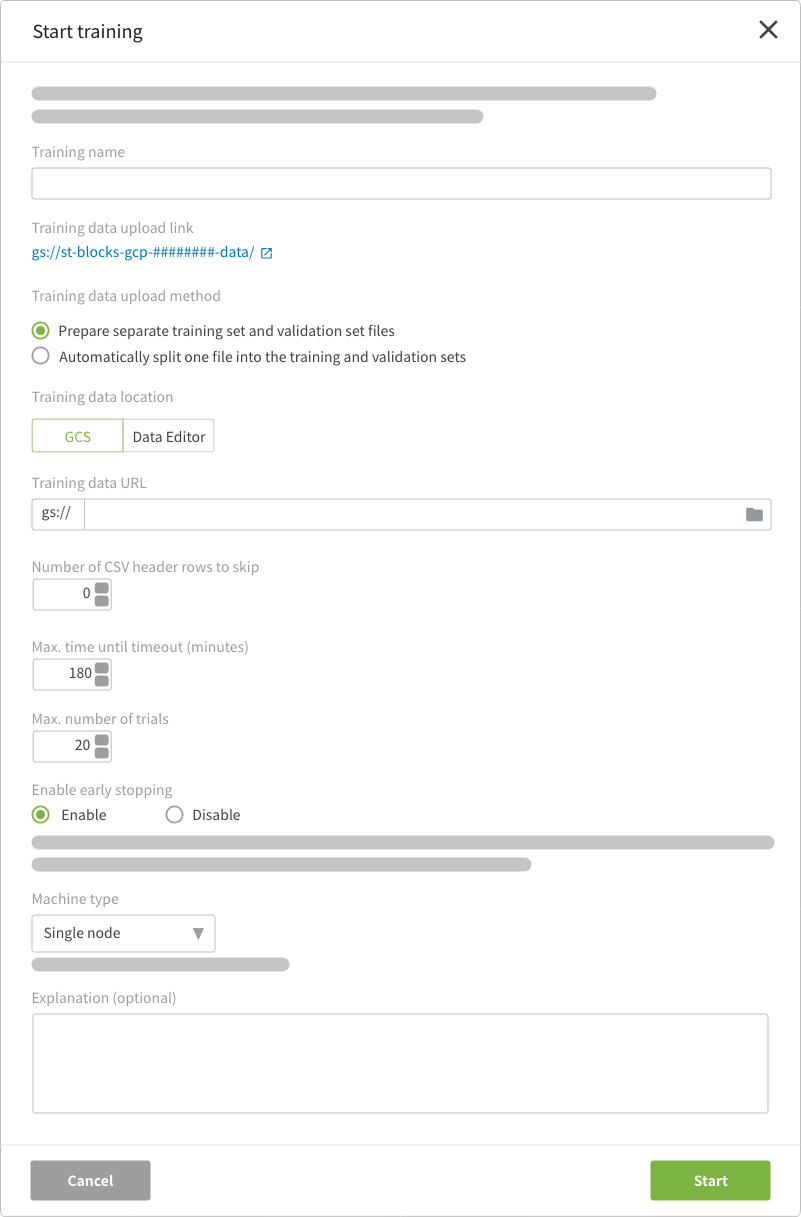
Each setting is explained below:
| Setting | Explanation |
|---|---|
| Training name | Assign a name to the new training |
| Upload training data |
This shows the GCS location where your training data will be saved as Click the link to open the Google Cloud Console in another tab where you can access this GCS location. You will need to sign in using a Google account registered into the GCP access section of the project settings screen. info_outlineThis is displayed for Full Service Plan users only. |
| Training data upload method |
Select which method you will use for uploading the training data.
|
| Training data location |
Designate whether your data is stored as CSV files in GCS or as a table in the DataEditor. |
| Training set URL/Training data URL |
Designate the GCS URL for the training set or training data ( These URLs should only contain ASCII letters, numbers, underscores ( Clicking folder opens a GCS file menu. Select your file and its URL will be entered in the correct format. |
| Validation set URL |
Designate the GCS URL for the validation set (Example: These URLs should only contain ASCII letters, numbers, underscores ( Clicking folder opens a GCS file menu. Select your file and its URL will be entered in the correct format. |
| Training table |
Select the DataEditor table that contains your training data. If your training table contains a column named key, BLOCKS will omit this column when running the training. |
| Number of CSV header rows to skip |
Use this option to skip header rows in the CSV files used in your training data. If there are header rows, enter the number of header rows to skip. Enter 0 if there are no header rows in your training data files. |
| Max. time until timeout |
In order to get the most accurate possible results, the Model Generator can run multiple training trials. This property configures the maximum amount of time the Model Generator will spend on each trial. Set this to info_outline If the training’s results (accuracy/RMSE) start to deteriorate, trials will be stopped prior to reaching the “Max. time until timeout”. |
| Max. number of trials |
Set the number of trials that the Model Generator will run as a number info_outline The approximate training time can be calculated as (Max. time until timeout) × (Max. number of trials). The actual time may be a bit longer due to additional/indirect processing times. |
| Enable early stopping |
Select whether to Enable or Disable detection for early stopping. With this option enabled, BLOCKS will stop the training before the end of the specified training time if it determines that accuracy is unlikely to improve. While this can reduce unnecessary training time, please be aware that accurately determining early stopping cannot be guaranteed. |
| Machine type |
Select the type of machine to use for the training.
|
| Explanation |
Write an explanation for this training. (optional) If you are using data from the DataEditor, the name, dataset ID, and table ID will be automatically entered. |
Image classification model
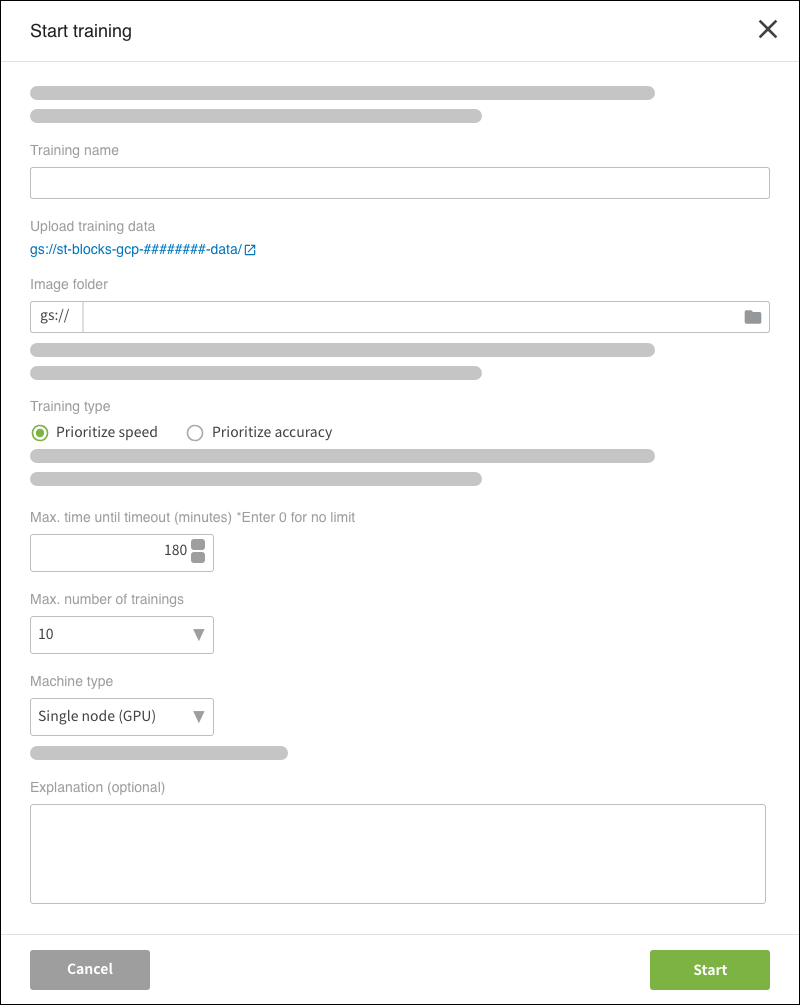
Each setting is explained below:
| Setting | Explanation |
|---|---|
| Training name | Designate a name for the training. |
| Upload training data |
A link to a Google Cloud Storage (GCS) location to use for uploading training
data is displayed here. The URL's format is Clicking the link will open the Google Cloud Console in another tab. From there you can access this GCS location. You will need to log in using the Google account registered in the GCP access section of the BLOCKS project settings screen. info_outline This is displayed for Full Service Plan users only. |
| Image folder |
Designate the URL of the GCS folder that contains your training images ( Clicking folder opens a GCS file menu. Select your folder and its URL will be entered with the format explained above. The image folder should follow these specifications: 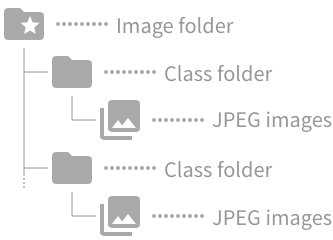
For example, if classifying images of dogs and cats, put pictures of dogs into one folder and pictures of cats into another. |
| Training type |
Select the type of training.
|
| Max. time until timeout (minutes) |
Configure the maximum amount of time that the training will take. |
| Max. number of trials |
Set the number of trials that the Model Generator will run as a number info_outline The approximate training time can be calculated as (Max. time until timeout) × (Max. number of trials). The actual time may be a bit longer due to additional/indirect processing times. |
| Enable early stopping |
Select to either Enable or Disable the early stopping option. Enable this option to have the training stop before the end of the specified training time if it determines that accuracy is unlikely to improve. While this can reduce unnecessary training time, please be aware that accurately determining early stopping cannot be guaranteed. info_outline This option is only available if you have selected Prioritize accuracy for your Training type. |
| Machine type |
Select the type of machine that will run the training.
|
| Explanation (optional) | Enter an explanation for the training. |
Object detection: manual setup
The settings are as follows:
| Setting | Explanation |
|---|---|
| Training name | Designate a name for the training. |
| Image folder |
Designate the GCS folder that containg the labelled training images. error_outline You should use at least 100 labelled training images. Using fewer training images may cause the training to fail. |
| Explanation (optional) | Enter an explanation for the training. |
GCP service charges
The Model Generator creates an environment in the user’s GCP project that uses various GCP services.
As such, GCP service charges will apply separately from MAGELLAN BLOCKS fees. Applicable charges will vary depending on the service. For details, refer to the pricing page for each of the services used by the Model Generator.